

Editor’s note: This article is written by a Guest Author and does not necessarily represent the views or insights of Appetiser Apps.
“If I have an app idea, what do I do?” Is this a lingering question in your mind lately?
The gap between “I have a good app idea” and “I have an app launched in the market” is not about code. It’s about doing the right things before you spend a dollar.
Do you build it now, develop the app idea further, or shelve it for good? Which features actually matter? How do you know if anyone will pay for your solution before spending months and tens of thousands of dollars?
Before you commit to development, you need a way to separate assumptions from evidence. That’s exactly what this guide will walk you through. You’ll learn the same early-stage approach that helps Appetiser get products into market faster without skipping the critical groundwork.
What do I do next with my app idea?
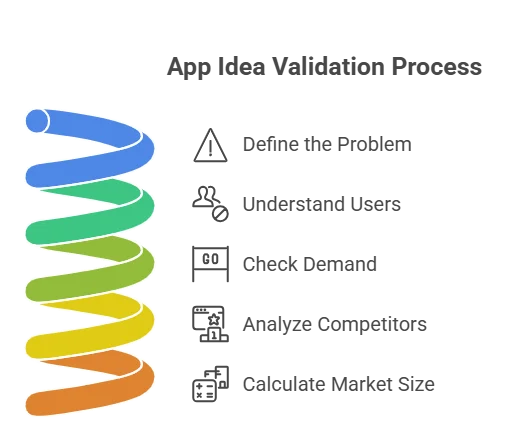
The first step is turn your app idea into something that can be tested with people. This can be accomplished by defining the problem you want to solve.
1. Define the problem your app idea solves
Start with a one-sentence problem statement that passes the “stranger test.” If someone outside your field gets it instantly, you are on the right track.
For example, “Freelancers lose hours each month chasing unpaid invoices” is clear and relatable. In contrast, vague lines about “process optimization” confuse people and weaken interest.
Your problem statement should include three clear parts.
- Who has the problem
- What goes wrong when it happens
- What it costs
2. Understand your potential users
Next, you need to understand your users’ expectations. Go beyond age and job titles. Instead, map their daily workflow, tools they use, and limits on budget. Also, note who makes buying decisions, because that matters more than interest alone.
For example, “Marketing managers at mid-size SaaS companies using Asana but struggling with user feedback” gives you direction. This detail helps you design smarter features. It also keeps your app idea grounded in real use cases. As a result, you avoid guessing later.
If you are building for a specific industry, your app must play well with others. For example, a hospitality app won’t get adopted unless it integrates seamlessly with the venue’s existing restaurant management software. Testing these integrations early prevents friction during user onboarding.
3. Check if there’s real demand for your app’s presence
Before you spend money building anything, test if people will take action. Create a simple landing page that explains your app idea clearly. Add one clear action like “Join the waitlist” or “Get early access.” Tools like Carrd or Webflow make this easy and fast.
Don’t limit your validation to digital ads. If your app serves a local community, print flyers to test real-world interest. You can use a qr code generator to create scannable links to your waitlist, allowing you to track exactly how many users convert from physical locations.
Watch what happens without pushing too hard. High sign-ups show real interest. Average results mean your message needs work. Very low results suggest weak demand.
You can also study competitor reviews. Look closely at what users complain about most. Those gaps often reveal chances to stand out. In addition, search data can show whether people actively look for solutions like yours.
Once validation proves real demand, you need a clear plan others can build from. At this stage, great ideas alone are not enough.
Designers and app developers need structure and direction. So, you must turn your concept into clear, buildable parts. This step saves time, money, and stress later.
1. Refine your app idea into clear features
Start by listing every feature you can think of. This is just the beginning; you should slow down and prioritize the app’s purpose.
- Must-have features support the core function of your app. Without them, the app fails.
- Should-have features improve the experience, but can wait.
- Could-have features add value later, while won’t-have features stay out for now.
For example, a therapist booking app needs a schedule view and booking confirmation. It also needs reminders to reduce missed sessions. Client notes may help, but are not critical at launch. Advanced marketing tools should wait until later.
2. Prioritize what should be built first
Build quick wins first because they bring high value with low effort. Next, tackle high-impact features that need more work. These features form the heart of your MVP (Minimum Viable Product). Leave low-impact features for later, even if they seem easy.
When prioritizing features, look for existing tools to handle complex tasks. For instance, instead of coding a custom support bot, you can integrate AI voice agent to handle automated calls and bookings. This reduces your initial development scope and helps you launch your MVP faster
A focused MVP helps you enter the market quickly. For example, GoodEmpire raised $1.5 million with a prototype, and Vello raised over $1 million with an MVP. This approach allows you to validate your idea without heavy upfront spending.
3. Shape the concept for designers and app developers
Before you speak with any developer, create a simple app idea snapshot.
First, include your one-sentence problem statement. Then, add a short paragraph about your target user. These features should support the main job your app performs.
After that, show one key user journey. Walk through how a user completes the main task step by step. Use simple language and real actions. This helps designers and developers picture the experience. It also exposes gaps you can fix early.
Finally, explain your rough monetization plan. Keep it simple and realistic. This snapshot does not need technical detail.
Working with an app development team
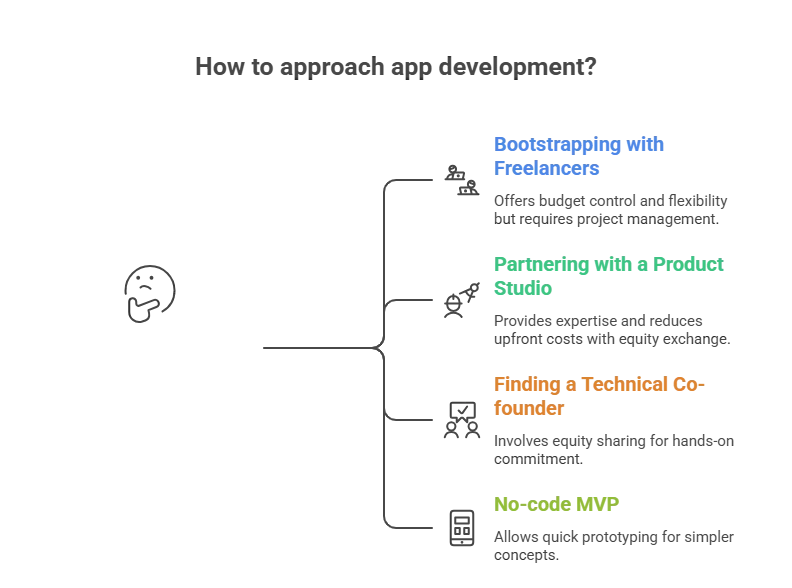
Freelancers and no-code tools can help you get started, but they often become limiting as your product grows. At Appetiser, we’ve developed a delivery system that removes unnecessary development overhead, helping founders get to market faster while building for long-term scale.
What happens when you speak with app experts
When you talk with app experts, they start with discovery sessions. They ask about your vision and your users’ daily steps. They also explore edge cases you may not see yet. As a result, they spot risks before they become costly mistakes.
How they convert your great app idea into a roadmap
Once your product direction is clear, the work is mapped into a structured delivery system.
At Appetiser, we typically start with a validation phase to define the opportunity and core product direction. From there, design and prototyping take around 2–3 weeks, turning the concept into a clear, testable product experience.
Development then focuses on building an MVP, with delivery shaped by scope and complexity.
This approach ensures features are prioritised correctly, unnecessary work is removed, and momentum is maintained from idea through to launch.
How cost and timelines are planned
At Appetiser, costs and timelines are shaped by scope, complexity, and the level of functionality required.
Well-scoped builds can move from validation through to launch in as little as 4 weeks, using a structured delivery process that focuses on the highest-impact features first.
As functionality and complexity increase, cost and delivery time scale accordingly.
This approach ensures every project is planned transparently from day one, with clear alignment between scope, effort, and delivery speed.
Building and launching your app
The MVP approach will help you turn a proven app idea into a real product. You do this without heavy upfront spending to create a successful app.
How the MVP approach works in your business plan
A minimum viable product has only the features needed to solve one core problem. It helps users complete one main task very well. For instance, Instagram started as a simple photo app without in-app purchases. Features like Stories and Reels came much later.
What the app store optimization (ASO) process looks like
The app development process usually moves in clear steps. First, designers create mockups and simple prototypes. These show how the app will look and feel. Next, app developers build the screens users see.
After that, backend work supports data and system logic. Then, teams connect all parts and test for bugs. Finally, they prepare for launch, and Google Play Store or Apple App Store reviews. This flow keeps work organized and predictable.
You will also meet your team often. Weekly check-ins let you see progress and test features. You can share user feedback early and guide changes in your successful app. This steady loop keeps the successful app close to your vision.
Testing and launch idea for an app
Before you launch your app icon, test it with at least 20 to 50 real users. Choose people who showed a strong interest during interviews. These users understand the problem well. Their feedback helps you spot issues early.
Add simple ways for users to share feedback inside the app. Then, fix the most common and serious problems first. At the same time, prepare your app store pages (Google Play Store and Apple App Store).
Bringing your idea for an app to real life
You don’t need to know how to code to bring your mobile app idea to life. What counts is disciplined validation, meticulous planning, and clever execution. When you follow this framework, you can quickly test if your great idea is worth investing in within weeks, not months.
Also, you concentrate on building only those features that really attract users. And finally, you work with the right team to get it done quickly and sooner.
If you want valuable guidance to move faster and make informed decisions, contact the Appetiser Apps for a strategy call once you’re ready. Explore how you can shape, validate, and build your app idea with confidence.
Author Bio

Natasha specializes in content marketing and she has been doing it for more than 6 years. She loves creating content marketing maps for businesses in different niches including technology and SaaS. Natasha has written content for various publication websites.

Maria Krisette Lim is a Content Marketing Specialist with 14 years of experience producing web and print ad content. Krisette has a BSBA degree, major in Business Management and Entrepreneurship. When she’s not tinkering with words and punctuation, she’s either curled up with a book while sipping hot tea, playing with her toddler, or tinkering with website builders.